HOW TO INSTALL AN MF CEILING SYSTEM IN 7 SIMPLE STEPS
How to Install an Metal Frame Ceiling System.
Learn how to effortlessly install an MF ceiling system in just 7 simple steps for the perfect ceiling finish.
MF ceiling systems are a popular choice for both commercial and residential applications. They are relatively easy to install and can provide a number of benefits, including:
• A smooth, finished ceiling that is free of imperfections
• Improved soundproofing and insulation
• Concealment of wiring and other services
• A variety of design options
To install an metal furring ceiling system, you will need the following materials:
• MF6A perimeter channel
• MF7 primary support channel
• MF5 furring sections (also known as ''top hat sections'')
• MF9 furring channel connecting clips
• Plasterboard
• Drywall screws
• Wafer head screws
• Fixings for the perimeter channel (depending on the wall type)
• Hangers
Tools required:
• Spirit level/Laser level
• Measuring tape
• Pencil
• Drill
• Screwdriver
Step 1: Make sure you have all the correct materials and tools.
Before installation starts, it will be worthwhile go through the 2 lists above to ensure you have everything you need to complete the job. If you aren't sure how to work out quantities, Buildershop can help with that. Simply go to the contact us link at the top of this page and send details of your project. For this we would ideally need a set of plans/working drawings. If you don't have these, just send details of the perimeter measurements for all rooms where the MF Ceiling System is being installed. We would also need to know what the drop is from the fixing point above and what sort of ceiling the fixings are going into.
Step 2: Set the ceiling level
Decide of how far below your existing ceiling the new MF suspended ceiling will fit. Use a spirit level or laser level to mark the desired ceiling level around the perimeter of the room.
Step 3: Fit the perimeter channel
Start by measuring the length and width of the room and then cut the MF6A perimeter channel to length and fix it to the walls at the marked level using the appropriate fixings such as metal nail in or plastic hammerfix. These should be fixed at no more than 600mm centres. Make sure that the channel is level and secure. The MF6A perimeter support then provides a point where the MF7 will sit on top of and the MF5 can be inserted into.
Step 4: Install MF17 hangers
To provide strength for the metal ceiling grid, you will now need to fix the The MF17 25 x 25mm galvanised angle. This is attached to the existing ceiling or roof joists and support the grid system. To ensure the MF17 hanger angles are cut at the correct length, simply measure from the existing ceiling to the underside of the MF6A channel that is already in place. If for example you have a ceiling drop of 500mm, you will need to cut the MF17 at 500mm.
Then at a maximum distance of 450mm from the wall mark your first fixing point. Follow this by marking 1200mm intervals and then do the same from the opposite wall. This will then form a 1200 x 1200mm grid. At each intersection of the lines, fix a hanger angle to the ceiling using MF12 angle brackets and MF11 nuts and bolts. If you need your MF ceiling to have the best acoustic performance, then acoustic hangers should be used instead of angle brackets.
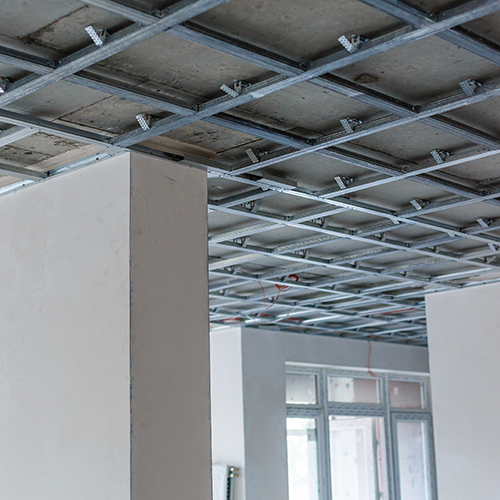
Step 5: Build the grid frames
Next you need to fit the MF7 primary support channel. The channel length should be the same size as in the previous step, but it is advised to cut it slightly shorter by 3-5mm for an easy fit. After the channel has been cut, it should easily drop in place and rest on the perimeter alongside the hanger angles. Be sure to use 13mm wafer head screws for the metal components to securely fix together, and continue this process until all primary channels are in place. The primary support channels should be spaced at 1200mm centres.
Once the primary support channels are in place, cut the MF5 metal furring sections to length and fix them to the primary support channels at 400mm or 450mm centres. This will have a bearing on what size plasterboards are to be used.
If the length or width of the room exceeds 3.6m, overlap the furring sections by 150mm. Use the MF9 support clips to attach the furring sections to the MF7. Make sure that the dished part of the metal section, called the "top hat", is facing down.
Once this has been repeated, the metal grid system will be complete and ready for the fixing of plasterboards.
Step 6: Attach the plasterboard
Carefully place the plasterboard on the grid system, making sure that the long edge is at right angles to the furring sections. Fix the plasterboard to the MF5 ceiling sections using drywall screws. The screws should be spaced at 230mm maximum centres within the field of the boards and 150mm at board ends. Stagger the plasterboard joints across the ceiling to complete the build.
Step 7: Finish the ceiling
Depending of the edge details of the plasterboard that are in place, you can finish the ceiling by one of two methods:
1. Tape the joints using as suitable self adhesive scrim tape and plaster ('skim') the surface using either Thistle Board Finish or Thistle Multi Finish. Once dried out, the ceiling can then be painted.
2. If tapered edged plasterboards have been used, joints can be taped and filled along with the screw holes using a suitable joint filler. Once the filler has dried, the surface can then be sealed with a suitable sealer such as Gyproc Drywall Sealer. Once this has dried, you can paint the ceiling.
Additional tips for installing an MF ceiling system
• Make sure that all of the components are level and secure before moving on to the next step.
• Use a sharp knife to cut the plasterboard to size.
• Be careful not to overtighten the drywall screws, as this can damage the plasterboard.
• If you are installing the ceiling in a humid environment, use moisture-resistant plasterboard.
• If you are installing the ceiling in a fire-rated environment, use fire-resistant plasterboard.
Common mistakes to avoid:
• Not setting the ceiling level correctly.
• Not fixing the perimeter channel securely.
• Not installing hangers where required.
• Overlapping the furring sections incorrectly.
• Not fixing the plasterboard to the furring sections securely.
• Not staggering the plasterboard joints.
• Not using the correct type of plasterboard for the environment.
• Overtightening the drywall screws.
Conclusion:
Installing an MF ceiling system is a relatively straightforward process, but it is important to follow the steps carefully and to use the correct materials and tools. By following the tips and advice in this article, you can ensure that your new ceiling is installed correctly and looks its best. If you are unsure about any aspect of installing an MF ceiling system, it is always best to speak with a qualified professional.